Project Gutenberg's Knots, Bends, Splices, by J. Netherclift Jutsum

This eBook is for the use of anyone anywhere at no cost and with
almost no restrictions whatsoever.  You may copy it, give it away or
re-use it under the terms of the Project Gutenberg License included
with this eBook or online at www.gutenberg.org


Title: Knots, Bends, Splices
       With tables of strengths of ropes, etc. and wire rigging

Author: J. Netherclift Jutsum

Release Date: January 16, 2010 [EBook #30983]

Language: English

Character set encoding: ISO-8859-1

*** START OF THIS PROJECT GUTENBERG EBOOK KNOTS, BENDS, SPLICES ***


Produced by Al Haines

The object of this little work is to present in a compact form and systematic order a complete list of all the most useful and important workings connected with Cordage, and a lucid explanation of their various formations.
The explanations of some of the elementary knots have been gone into with what a practical seaman of even short experience may consider almost unnecessary minuteness, but the aim throughout has been to render the work of value to those who approach the subject for the first time.
To attain this end, diagrams are introduced at every stage, and if followed closely step by step, in conjunction with the text referring to them, the learner should have no difficulty in following their construction.
At the same time he must remember that proficiency in what is really skilled workmanship, amounting almost to an art, can only be gained by much practice and perseverance, and should gladly avail himself of any advice or help he may be able to obtain from his more experienced ship-mates.
J. NETHERCLIFT JUTSUM.
                                                                  PAGE

The Construction of Ropes  . . . . . . . . . . . . . . . . . . .     1

Common Whipping, . . . . . . . . . . . . . . . . . . . . . . . .     3

Knots, etc., formed by a Single Rope's-end--
  Overhand Knot  . . . . . . . . . . . . . . . . . . . . . . . .     5
  Figure of 8  . . . . . . . . . . . . . . . . . . . . . . . . .     5
  Simple Clinch  . . . . . . . . . . . . . . . . . . . . . . . .     5
  Running or Inside Clinch . . . . . . . . . . . . . . . . . . .     6
  Outside Clinch . . . . . . . . . . . . . . . . . . . . . . . .     7
  Buntline Hitch . . . . . . . . . . . . . . . . . . . . . . . .     7
  Bowline  . . . . . . . . . . . . . . . . . . . . . . . . . . .     8
  Running Bowline  . . . . . . . . . . . . . . . . . . . . . . .     9
  Half Hitch . . . . . . . . . . . . . . . . . . . . . . . . . .    10
  Round Turn and Two Half Hitches  . . . . . . . . . . . . . . .    11
  Clove Hitch  . . . . . . . . . . . . . . . . . . . . . . . . .    12
  Rolling Hitch  . . . . . . . . . . . . . . . . . . . . . . . .    13
  Timber Hitch . . . . . . . . . . . . . . . . . . . . . . . . .    14
  Fisherman's Bend . . . . . . . . . . . . . . . . . . . . . . .    15
  Topsail Halliard Bend  . . . . . . . . . . . . . . . . . . . .    16
  Stun'sail Bend . . . . . . . . . . . . . . . . . . . . . . . .    17
  Blackwall Hitch  . . . . . . . . . . . . . . . . . . . . . . .    17
  Midshipman's Hitch . . . . . . . . . . . . . . . . . . . . . .    18
  Double Blackwall Hitch . . . . . . . . . . . . . . . . . . . .    19

Knots, etc., made on the Bight of a Rope--
  A Bowline on the Bight . . . . . . . . . . . . . . . . . . . .    20
  Marlinespike Hitch . . . . . . . . . . . . . . . . . . . . . .    21
  Sheepshank . . . . . . . . . . . . . . . . . . . . . . . . . .    22
  Catspaw  . . . . . . . . . . . . . . . . . . . . . . . . . . .    22

Knots, Bends, etc., for Uniting Ropes--
  Reef Knot  . . . . . . . . . . . . . . . . . . . . . . . . . .    24
  Common or Sheet Bend . . . . . . . . . . . . . . . . . . . . .    24
  Single Carrick Bend  . . . . . . . . . . . . . . . . . . . . .    26
  Double Carrick Bend  . . . . . . . . . . . . . . . . . . . . .    27
  Diamond Knot . . . . . . . . . . . . . . . . . . . . . . . . .    27

Knots formed on Ropes by their own Strands--
  Wall Knot  . . . . . . . . . . . . . . . . . . . . . . . . . . 30-33
  Double Wall Knot . . . . . . . . . . . . . . . . . . . . . . .    33
  Crown Knot . . . . . . . . . . . . . . . . . . . . . . . . . .    33
  Manrope Knot . . . . . . . . . . . . . . . . . . . . . . . . .    34
  Stopper Knot . . . . . . . . . . . . . . . . . . . . . . . . .    34
  Single Matthew Walker  . . . . . . . . . . . . . . . . . . . .    35
  Double Matthew Walker  . . . . . . . . . . . . . . . . . . . .    36
  Another form of Diamond Knot (Single)  . . . . . . . . . . . .    38
  Double Diamond Knot  . . . . . . . . . . . . . . . . . . . . .    39
  Shroud Knot  . . . . . . . . . . . . . . . . . . . . . . . . .    40
  Spritsail Sheet Knot . . . . . . . . . . . . . . . . . . . . .    41

Splices--
  Eye Splice . . . . . . . . . . . . . . . . . . . . . . . . . .    43
  Short Splice . . . . . . . . . . . . . . . . . . . . . . . . .    44
  Cut Splice . . . . . . . . . . . . . . . . . . . . . . . . . .    45
  Long Splice  . . . . . . . . . . . . . . . . . . . . . . . . .    45
  Grommet  . . . . . . . . . . . . . . . . . . . . . . . . . . .    46

Wire Splicing--
  Eye Splice . . . . . . . . . . . . . . . . . . . . . . . . . .    47
  Long Splice  . . . . . . . . . . . . . . . . . . . . . . . . .    48

Purchases--
  Single Whip  . . . . . . . . . . . . . . . . . . . . . . . . .    49
  Double Whip  . . . . . . . . . . . . . . . . . . . . . . . . .    49
  Runner . . . . . . . . . . . . . . . . . . . . . . . . . . . .    50
  Gun Tackle . . . . . . . . . . . . . . . . . . . . . . . . . .    50
  Handy Billy or Jigger  . . . . . . . . . . . . . . . . . . . .    51
  Watch or Luff Tackle . . . . . . . . . . . . . . . . . . . . .    51
  Double Luff  . . . . . . . . . . . . . . . . . . . . . . . . .    52
  Three-fold Purchase  . . . . . . . . . . . . . . . . . . . . .    52
  Four-fold Purchase . . . . . . . . . . . . . . . . . . . . . .    53
  Single Spanish Burton  . . . . . . . . . . . . . . . . . . . .    53
  Double Spanish Burton (two forms)  . . . . . . . . . . . . . .    54
  Spanish Windlass . . . . . . . . . . . . . . . . . . . . . . .    55

Miscellaneous Odds and Ends--
  Palm and Needle Whipping . . . . . . . . . . . . . . . . . . .    56
  West Country Whipping  . . . . . . . . . . . . . . . . . . . .    56
  American Whipping  . . . . . . . . . . . . . . . . . . . . . .    57
  To Point a Rope End  . . . . . . . . . . . . . . . . . . . . .    57
  Turk's Head  . . . . . . . . . . . . . . . . . . . . . . . . . 58-60
  Mousing a Hook . . . . . . . . . . . . . . . . . . . . . . . .    60
  Securing Lead Line to Lead . . . . . . . . . . . . . . . . . .    61
  Fitting a Flag . . . . . . . . . . . . . . . . . . . . . . . .    61
  Cringles . . . . . . . . . . . . . . . . . . . . . . . . . . . 61-64
  Lengthening the Rope of a Sail . . . . . . . . . . . . . . . .    64
  Jury Knot  . . . . . . . . . . . . . . . . . . . . . . . . . . 65-66
  Sling for a Barrel . . . . . . . . . . . . . . . . . . . . . . 67-68
  Chain Knot . . . . . . . . . . . . . . . . . . . . . . . . . . 68-69
  Double Chain . . . . . . . . . . . . . . . . . . . . . . . . . 69-70
  Twist or Plain Knot  . . . . . . . . . . . . . . . . . . . . .    71

Wire Rope Splicing, etc.--
  How to Handle Wire Rope  . . . . . . . . . . . . . . . . . . .    72
  Set of Wire Rope Splicing Tools  . . . . . . . . . . . . . . .    74
  Directions for Splicing  . . . . . . . . . . . . . . . . . . . 76-78
  Splicing Thimbles  . . . . . . . . . . . . . . . . . . . . . . 78-82

Tables showing the Respective Weights and  Strengths of Various
  Cordage  . . . . . . . . . . . . . . . . . . . . . . . . . . . 83-86
Rope, the term being used in its widest construction, is made from almost every pliable material, but is generally composed of hemp, manila, coir, cotton, steel, iron, or copper wire.
For the present we will confine ourselves to those having their origin in the vegetable kingdom, and more especially to those made from hemp and manila.
These are divided into three classes:—
(1). A Hawser-laid Rope, which is composed of three strands laid up generally right-handed (that is, the direction taken by the strands in forming the rope runs always from left to right) (Fig. 1.)
(2). A Shroud-laid Rope, also laid up right-handed, but consisting of four strands (Fig. 2) with a heart in the centre.
(3). A Cable-laid Rope, which is composed of three right-handed hawser-laid ropes laid up together left-handed, so that it may be said to consist of nine strands (Fig. 3), or it may be formed by three left-handed ropes laid up right-handed (Fig. 4).
{2}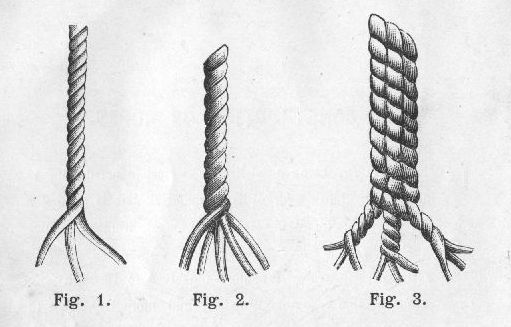
In Fig. 4 we show a more complete analysis of its construction (in this case a right-handed cable-laid rope).
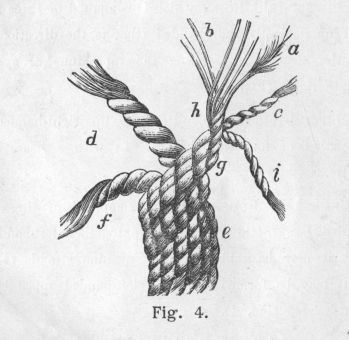
First we see the cable e formed by the three ropes d, f, and g; whilst the rope g is dissected to show the strands forming it, c, h, j; and in the strand h we see b, the yarn composing the strand, and a a yarn teased out to show the original fibre.
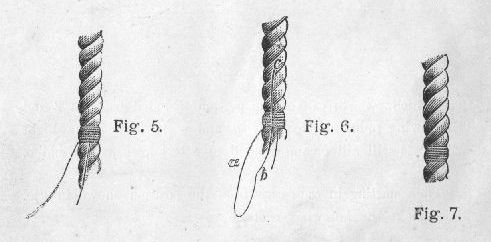
The end of a rope must always be secured in some way, or it is evident from its construction that it will on the slightest usage become frayed out. The commonest method is by placing on an ordinary whipping, which is done as follows:—First lay the end of a length of twine along the end of the rope, and then commencing at the part furthest from the rope's end take a half dozen or more turns around both the rope and twine end (Fig. 5). Then lay the twine in the form of a loop along the rope and over the turns already taken, as in Fig. 6. To finish off take that portion of the loop designated a, and continue taking turns tightly round the rope and part b of the twine until the loop is nearly all used up; pull through the remainder snugly by part c, and cut off short when, no end of twine will be visible as in Fig. 7.
Considering that we now have at our disposal a small sized rope with the end whipped, we will at once proceed to the formation of the most elementary knots and hitches, namely, those formed by a single rope's end.
Fig. 8 shows a common loop, by which most of the following knots, etc., are commenced. Note exactly how the loop lies, and let us letter its parts clearly for future reference. The part of rope extending from 1 to 2 is known as the standing part which we will call a, the portion included between 2 and 3 following round the loop by y and z is termed the bight which we will call b, and from 3 to 4 is known as the end e.
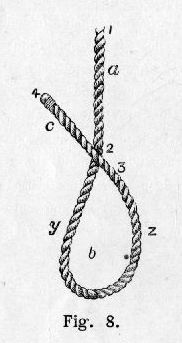
Then starting in each case from the position shown in Fig. 8 we make the following knots, etc:—
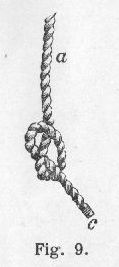
{5}(1). An Overhand Knot.—Place e up through bight b, and draw taut (Fig. 9).
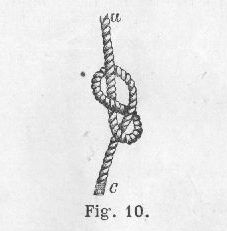
(2). A Figure of Eight Knot.—Back e round behind a, bring over part z and dip down through bight b and haul taut (Fig. 10).
(3). A Simple Clinch is formed by closing up the initial loop to form a small ring and securing by a seizing—a small lashing at d (Fig. 11).
{6}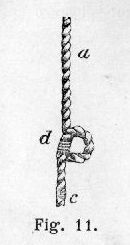
One of the preceding knots is generally put in the end of running gear to prevent it from coming unrove from the fair-leads or blocks.
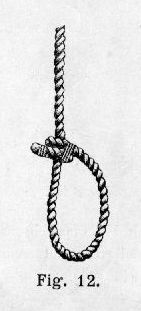
(4). A Running or Inside Clinch is the foregoing, formed by the end of a rope on its own standing part, and is often used for securing buntlines to the foot of a sail (Fig. 12).
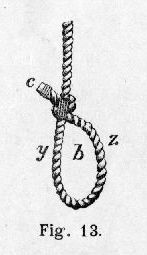
(5.) An Outside Clinch, as may be inferred from its name, is formed in a similar manner, but the end c is brought round on top, that is, away from the bight (Fig. 13). It is used in cases where it is essential that the end should not be in a position to jam, but always ready for slipping at a moment's notice, as in securing cable ends, etc.
(6). A Buntline Hitch (an alternative method of securing buntlines to a sail) is commenced as in making an outside clinch, but instead of putting on a seizing, take a longer end c, pass it over y, bring up through bight b, and tuck the end again over part y and through the last loop formed, so that the end c lies close to the commencement of part z (Fig. 14).
{8}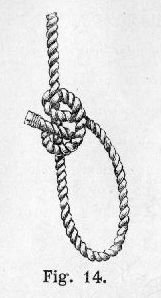
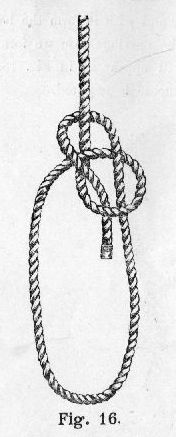
(7). A Bowline.—Reverting to our original loop (Fig. 8), first taking part z in the right hand with y in the left, throw a loop over c, the end, as in Fig. 15.
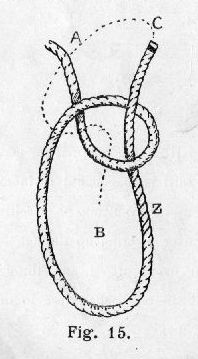
Secondly, lead c round behind part a and pass it down through the last made loop, as indicated by the dotted line, and haul taut as in Fig. 16.
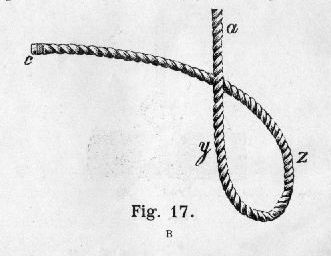
(8). A Running Bowline.—Form a loop with a long end c lying underneath the standing part a (Fig. 17).
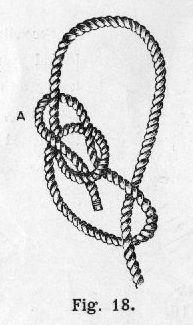
Now bring end c over part y and with it form the bowline knot on part z just as in the previous case we formed it on its own part, when it will appear as in Fig. 18. It is used whenever a running noose is required.
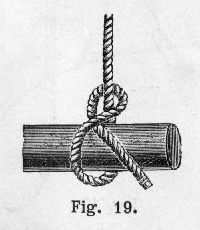
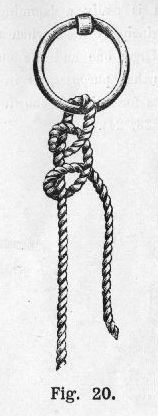
(9). The formation of a half hitch (Fig. 19), and two half hitches (Fig. 20) is sufficiently indicated by those diagrams.
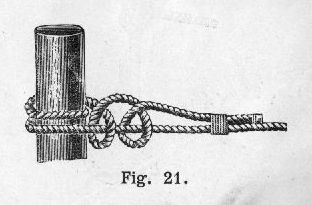
The commonest method of making a rope's end fast to a bollard, etc., is by taking a round turn and two half hitches, and stopping the end back for further security (Fig. 21).
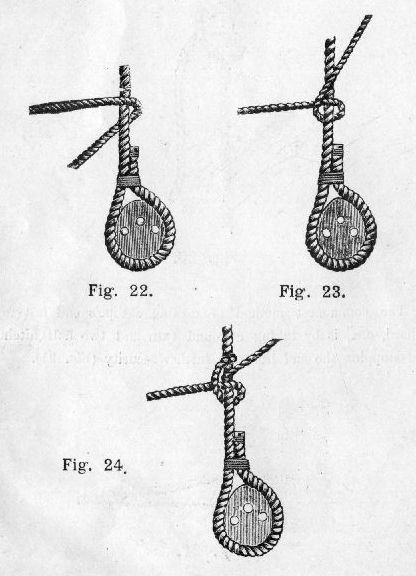
(10). A Clove Hitch is really a jamming form of two half hitches, and is principally used when a small rope has to be secured to a larger one and the end still kept free to pass along for further purposes, as in securing ratlines to the shrouds. Its formation is shown in three successive stages (Figs. 22, 23, 24).
(11). A Rolling Hitch is commenced and finished like a clove hitch, but as will be seen from the three diagrams (Figs. 25, 26, 27) illustrating its construction, there is an intermediate round turn between the first and last hitches. It is principally used for securing the tail of a handy billy or snatch block to a larger rope, or when hanging off a rope with a stopper.
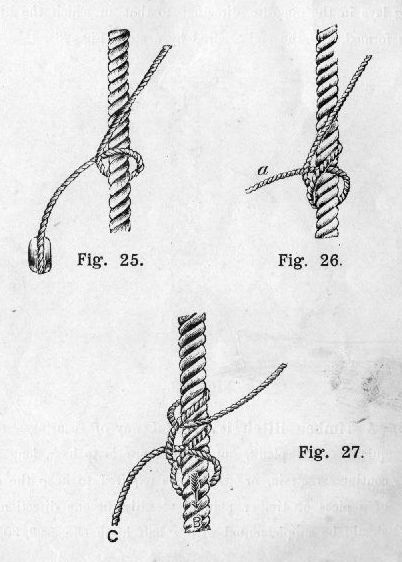
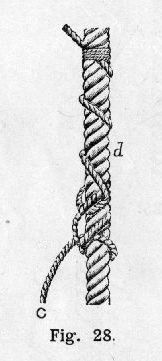
Note that the round turn in (Fig. 26) is taken round both the standing part a and the larger rope. The great value of this hitch is its non-liability to slip in the direction B (Fig. 27). If, however, owing to an extremely severe strain or other causes the hitch is inclined to slip, the end e should be backed round part d of the first rope, that is, twisted around it in long lays in the opposite direction to that in which the hitch was formed, and the end secured by a stop (Fig. 28).
(12). A Timber Hitch is a useful way of securing a rope quickly to a plank, but when there is to be a long and continuous strain, or when it is required to keep the end of a piece of timber pointed steadily in one direction, it should be supplemented with a half hitch (Figs. 29, 30).
{15}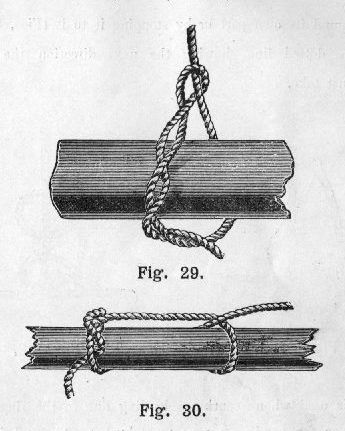
The timber hitch itself consists simply of a half hitch taken with a rather long end, which is used up by twisting it back around its own part of the hitch. In Fig. 29 the hitch is purposely left very loose so that its formation may be the more easily seen.
(13) A Fisherman's Bend is formed by taking two round turns around the object to which the rope is to be secured, and then backing the end round in the form of a half hitch under both the standing part and second round turn. The end may be further secured by taking a half hitch {16} around its own part or by stopping it to it (Figs. 31, 32), the dotted line showing the next direction the end c must take.
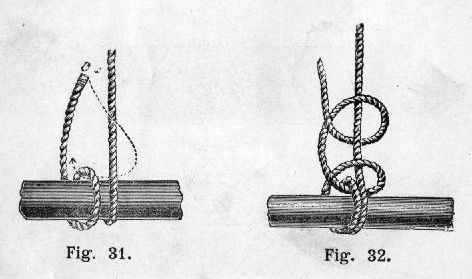
It is used when securing a hauling line to the ring of the kedge, or for bending a rope to a bucket, etc., and is often called a bucket hitch.
(14). A Topsail Halyard Bend.—This bend is never seen in deep water ships, but is sometimes used on board yachts. It is commenced in a similar manner to a fisherman's bend, but three round turns are first taken around the spar, the end being backed around the standing part a and then led under all three turns as in Fig. 33, and then again backed over the last two round turns and under the first, as shown in Fig. 34.
{17}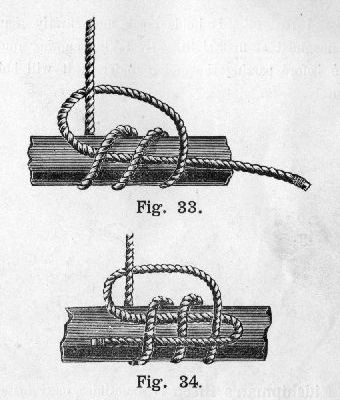
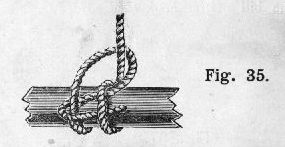
(14). A Stun'sail Halyard Bend is simply a Fisherman's bend with the end backed again over the last round turn and under the first (Fig. 35).
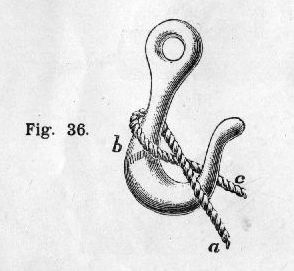
(15). A Blackwall Hitch is a quick way of temporarily securing a rope to a hook. As will be seen from the illustration (Fig. 36) it consists of a half hitch, the standing part a as soon as it receives the strain jamming {18} the end part c. It holds much more firmly than would be imagined at first sight. By taking another round turn at b before passing the end c under a, it will hold more securely.
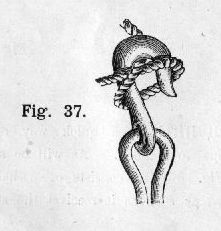
(17). A Midshipman's Hitch is sometimes used instead of a Blackwall hitch, and will hold better if the rope is at all greasy. It is made by first forming a Blackwall hitch and then taking the underneath part and placing it over the bill of the hook (Fig. 37).
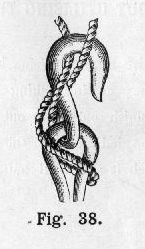
(18). A Double Blackwall Hitch is made by taking the bight of the rope and placing it across the neck of the strop of the block, crossing it behind, then placing the under part over the hook and crossing the upper part on top of it (Fig. 38). It holds better than either of the two preceding hitches.
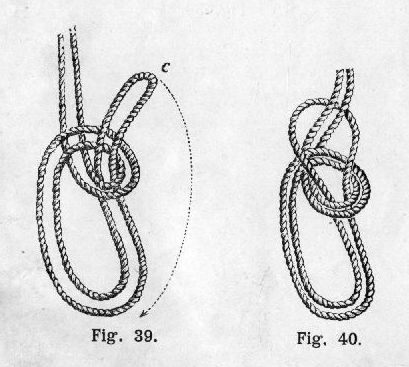
(1). A Bowline on the Bight—Using both parts of the rope together, commence as in making an ordinary bowline (Fig. 39). To finish off, open out bight c, and taking it in the direction indicated by the dotted line, pass the whole knot through it and haul taut, when it will appear as in Fig. 40.
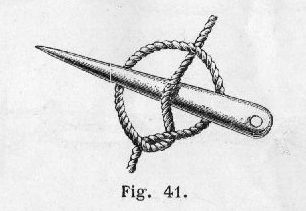
(2). A Marline-Spike Hitch is used for getting a purchase with a marline-spike, capstan bar, etc., when putting on a seizing or lashing. By Fig. 41 it will be seen to consist of the standing part picked through a loop laid over it, so that the spike lies under the standing part and over the sides of the loop.
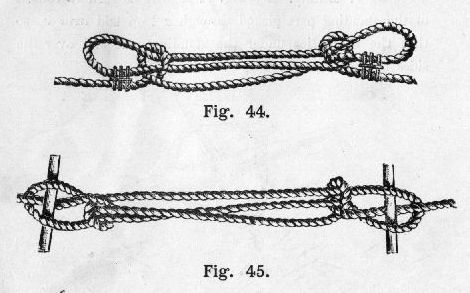
(3). A Sheep Shank is used for shortening a rope. Gather up the amount desired in the form of Fig. 42.

Then with parts a and b form a half hitch round the two parts of the bight as in Fig. 43.

To render it still more dependable, the bight a and b may be seized or toggled to the standing parts as in Figs. 44 and 45.
(4). A Catspaw is formed in a rope to make a temporary loop for hooking on the block of a tackle. First throw back a bight as in Fig. 46.
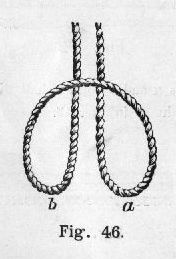
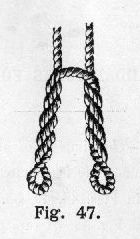
Then taking hold of a and b in either hand twist them up as in Fig. 47; bring together the two eyes a and b and hook in the tackle.
(1). A Reef Knot.—The simplest of all knots, and is always used when a common tie is required. Its formation may be easily traced in Figs. 48, 49, 50. Having constructed the knot as far as Fig. 48, be sure part a is kept in front of part b as here shown, and the end c led in according to the direction of the dotted line.

(2). A Common Bend or Sheet Bend.—In making a bend the ends of the two ropes are not used simultaneously as in forming a reef knot, but an eye or loop is first formed in the end of one of the ropes as in Fig. 51, and the other rope's end is then rove through it in various ways according to the bend desired.
{25}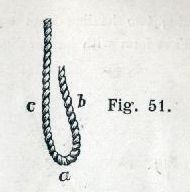
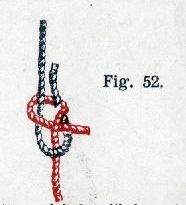
To form a Sheet Bend, pass the second rope's end underneath the eye at point a and bring up through the loop, then form with it a half hitch round c and b (Fig. 52).
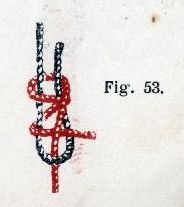
It will hold still better and is less likely to jamb if the end c is passed round again as in Fig. 53.
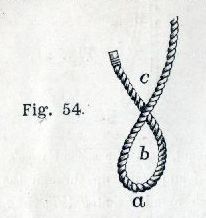
(3). For bending two hauling lines together use a Carrick Bend. First form with hawser No. 1 a loop as in Fig. 54.
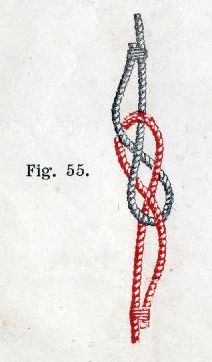
Pass the second hawser under the first at a, bring up through the eye b, back it over the cross at c, and bring up again towards you through the eye b, and then stop the ends of each hawser to their own respective parts (Fig. 55).
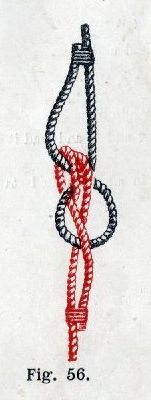
(4). A Double Carrick Bend is formed in precisely a similar manner, but a complete round turn is taken around the cross of the first hawser at c, and then led up again through the eye b and finished off as before (Fig. 56).
(5). A Diamond Knot formed by the two ends of a rope is really a fancy knot. It is often made with Hambro' line in forming lanyards for marline-spikes, knives, etc. It is a pretty knot and very easily made.
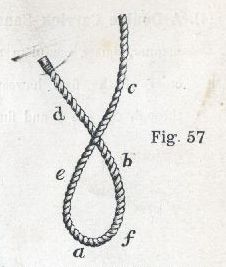
First lay one of the cords in a loop shaped as in Fig. 57.
{28}Notice carefully how this loop is lettered, and then, taking up the second cord, lay it under the loop at a, straight along also under the loop at b, now bring it over the first cord at c and under it at d and over it at e, then dip it under its own part now lying between a and b, and lead it over the first cord at f.
The knot, still in an unfinished state, will now appear as in Fig. 58.
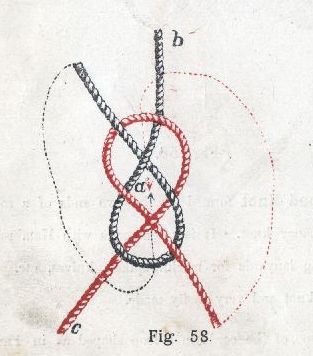
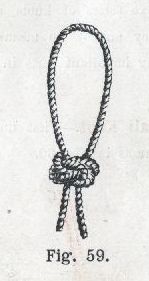
Now lead the ends in the direction indicated by the dotted lines (taking care beforehand that you have them sufficiently long for the purpose), and bring them both up through the opening a. Bring the two standing parts b and c together, and gradually render all parts in turn to work up the knot as tight as possible, when it will appear as in Fig. 59.
Although our next series of knots are generally known as "fancy knots" they are by no means merely ornamental, many of them playing important parts in the standing rigging of a ship.
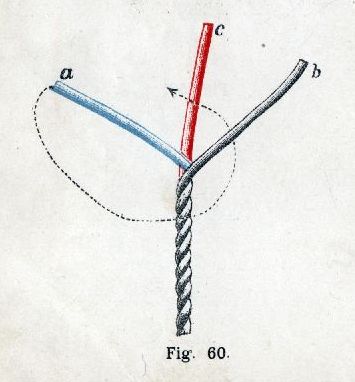
(1). To Form a Wall Knot.—First unlay the rope so that the strands appear as in Fig. 60.
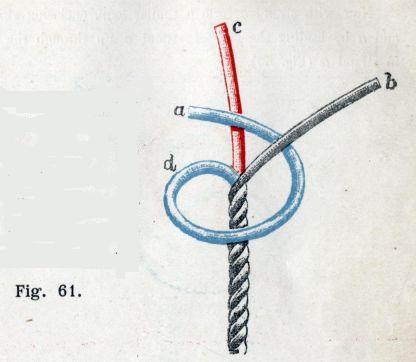
Holding the rope with the left hand, with the right lead strand a in the direction indicated by the dotted line, viz., under strand b and up between strands b and c (Fig. 61).
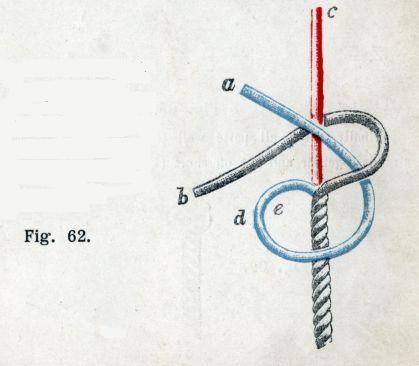
Then with strand b form a similar loop, enclosing strands a and c, and bringing the end of strand b up between a and d (Fig. 62).
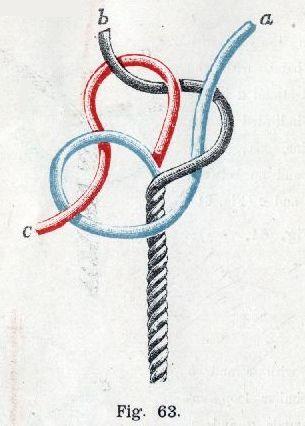
Now with strand c form a similar loop, enclosing strands b and a by leading the end of strand c up through the loop e in strand a (Fig. 63).
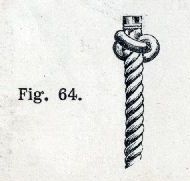
Finally, work all parts well taut, whip the ends of the strands together and cut off short (Fig. 64).
(2). A Double Wall Knot is formed by allowing each strand to again follow its lead as given in a single wall knot, opening out the first loops again with a pricker sufficiently for the purpose. The three strands are as before brought up in the centre and cut off short after whipping them together. This knot is also known as a stopper knot.
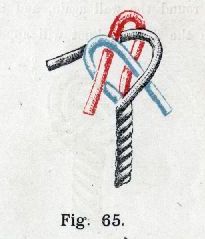
(3). A Crown Knot is formed by interlacing the strands in a similar manner to a wall knot, but the strands are successively led over each other instead of under. Its construction will be easily followed in Fig. 65.
Double crowning is done by following round each strand again alongside its first lead.
Our next two knots are but combinations of the wall and crown.
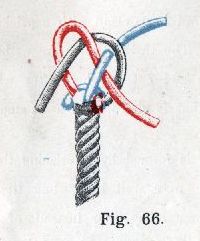
{34}(4). A Manrope Knot is made by first forming a wall and then crowning it (Fig. 66.)
Then follow round the wall again, and lastly, follow round the crown, when the finished knot will appear as in Fig. 67.
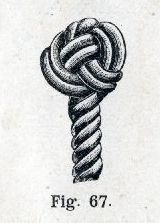
A knot formed by making a crown first and then a wall, and afterwards following round the crown and wall again is another form of the Stopper Knot. It is very similar in appearance when finished to a Manrope Knot.
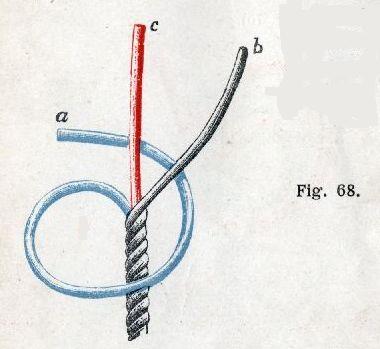
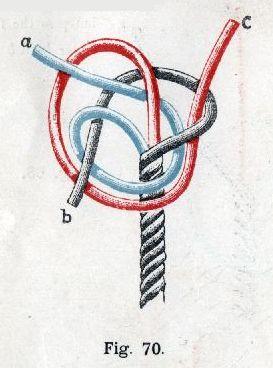
{35}(5). A Single Matthew Walker.—To make this knot commence similarly to a wall, but pass the first strand a under both b and c, as in Fig. 68.
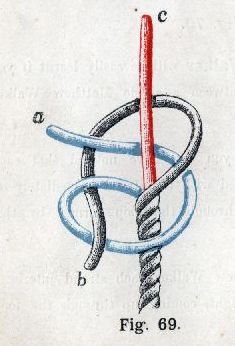
Then pass b under both strands c and a, and bring up through the loop first formed by a (Fig. 69).
Similarly pass c under a and b, and bring up through the loop first formed by b (Fig. 70).
(6). A Double Matthew Walker will be easily learnt if you notice the difference between a single Matthew Walker and a Wall Knot.
In the Wall Knot you will have noticed that each strand is simply interlaced with the strand immediately on its right coming up through the loop formed by this second strand.
In the single Matthew Walker each strand interlaces the two strands to its right, coming up through the loop of the third strand.
{37}Another evolution in the same order brings us to the double Matthew Walker. It is formed, as will be seen by carefully following diagram 71, by making each strand contain in its own loop, the other two strands, and its own end, that is, each strand leads up through its own bight after interlacing the other two.
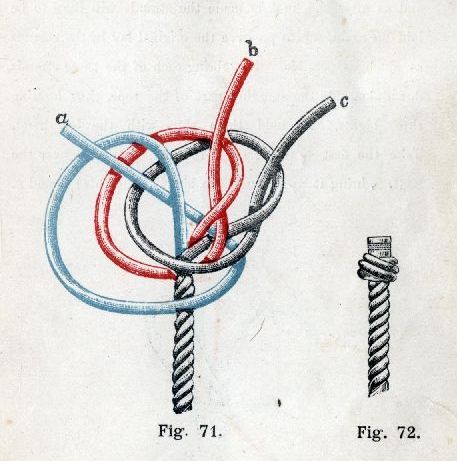
When worked taut and finished off, it will appear as in Fig. 72.
{38}(7). A Single Diamond Knot.—This is another method of forming the knot shown in Fig. 59, which in that case was formed by the two ends of the same rope.
To form it on a rope by its own strands, unlay the rope to the place where it is desired to form the knot, and as after the knot is made the strands will have to be laid up again, try to preserve the original lay in the strands as much as possible. Now bring each of the three strands down alongside the standing part of the rope, thus forming three bights, and hold them thus with the left hand. Take the first strand a (Fig. 73) and, putting it over the next, b, bring it up through the bight of the third strand c.
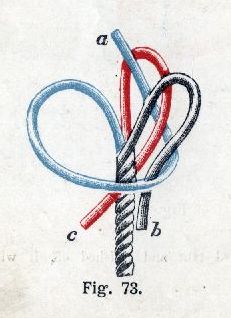
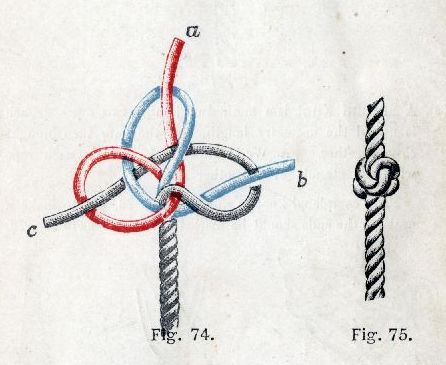
Take the end of the second strand over the third and up the bight of the first. The last strand is brought through over the first and up through the bight of the second. Haul taut, and lay the rope up again. Fig. 74 shows the loops in their places with the ends through them before they are hauled taut. Fig. 75 gives the knot finished.
For a double diamond we first make a single diamond, the ends are then made to follow the lead of the single knot through two single bights, the ends coming out on top of the knot. The last strand passes through two double bights. The ends are then hauled taut and laid up as before (Fig. 76).
{40}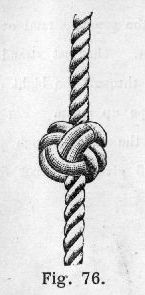
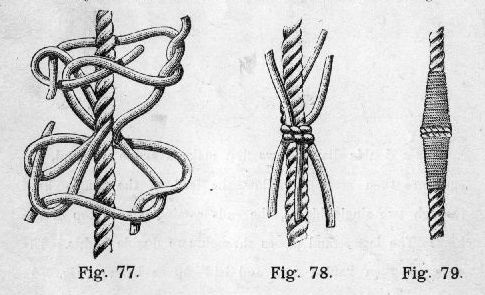
(8). A Shroud Knot is a method of joining two ropes. Each is unlaid the necessary length, and they are then brought close together. A Wall Knot is formed on each rope with the strands of the other (Fig. 77).
The completed knot is shown in Fig. 78, but to make a neat job the ends should be marled and served as in Fig. 79.
(9). A Spritsail Sheet Knot.—Unlay both ends of the rope and bring the two standing parts of the rope together as in Fig. 80.
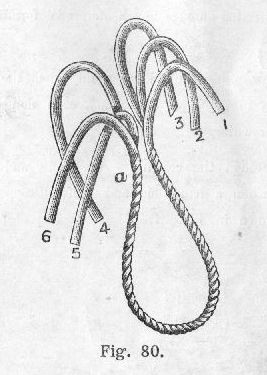
Grasping both parts of the rope at a, with the six strands form a Wall Knot, that is, by passing 1 under 2, 2 under 3, 3 under 4, 4 under 5, 5 under 6, and 6 under the loop formed by 1.
This would appear too confusing if shown in a diagram, but the knot is very easily made in practice.
Now lay any opposite two of the strands across the top {42} in an opposite direction, and crown by passing the other four, each in turn, alternately over and under these two.
Each of the six strands will then come out leading in a downward direction alongside the strands forming the first walling.
Now follow round the walling again, when the strands will come through in an upward direction, each alongside a strand of the first crowning.
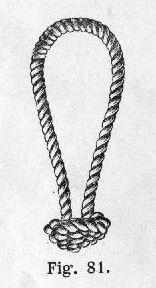
Follow through the crowning once more, and cut off the ends short, when a handsome and useful Stopper Knot will result, as shown in Fig. 81.
(1). An Eye Splice is formed by unlaying the end of a rope for a short distance, and then, after closing up the end, to form an eye of the desired size. Lay the three strands upon the standing part, now tuck the middle strand through the strand of the standing part of the rope next to it (against the lay of the rope), then pass the strand on the left over the strand under which No. 1 strand is tucked, and tuck it under the next, and lastly, put the remaining strand through the third strand on the other side of the rope (Fig. 82.)
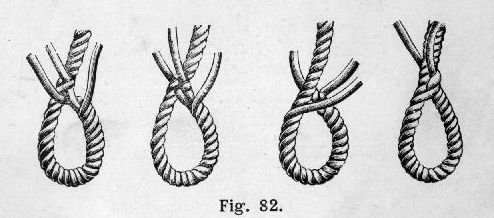
Now tuck each strand again alternately over a strand and under a strand of the rope, and then taper off by halving the strands before tucking the third time, and again halve them before the fourth tuck.
If the strands are tucked with the lay of the rope it is termed a Sailmaker's Splice.
(2). A Short Splice is used to join two ropes when it is not required to pass through a block. Unlay the two ropes the required distance, and clutch them together as in Fig. 83, that is, so that the strands of one rope go alternately between the strands of the other.
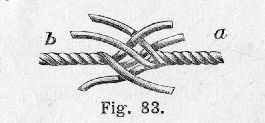
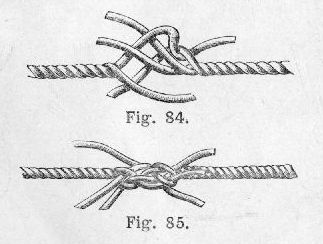
Then tuck the strands of rope a into the rope b in a similar manner to that described in an eye splice, and similarly tuck the strands of b into a (Figs. 84 and 85).
(3). A Cut Splice is made by laying two ropes in the position indicated in Fig. 86.
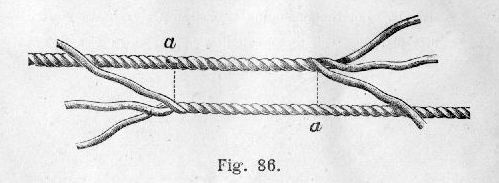
Leaving the ropes between a a to form an oblong loop, tuck the strands of one rope into the other as done in the eye splice. Splices are often wormed, parcelled, and served. Fig. 87 shows the cut splice after this treatment.
A log-line splice is a cut splice, but instead of allowing the loop to appear, the two lines are twisted together.

(4). A Long Splice is one of the most useful of splices, as it permits the rope to run through a block just the same as an unspliced rope.
Unlay the ends of two ropes to a distance about four times the length used in a short splice, and then clutch them together as if about to commence a short splice. Now unlay one strand for a considerable distance and fill {46} up the gap thus caused by twisting in the strand opposite to it of the other rope. Then do the same with two more strands. Let the remaining two strands stay as they were first placed. The ropes will now appear as in Fig. 88.

To finish off, tuck the ends as in a short splice, but with the lay of the rope, that is, so that the tuck will continually take place around the same strand, and taper off gradually by reducing the yarns in the strand.
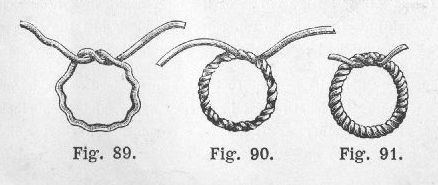
(5). To Make a Grommet, cut a strand about three and a half times the length of the grommet required. Unlay the rope carefully and keep the turns of the strand in. Close up the strand in the form of a ring (Fig. 89), and then pass the ends round and round in their original lay until all the intervals are filled up (Fig. 90), and then finish off the two ends as in a long splice (Fig. 91).
In splicing wire, great care should be taken to prevent kinks getting in the rope or strands.
With steel wire, always before working it, put a stop on at the place to which you intend to unlay, and also put a good whipping of twine at the end of each strand.
Steel wire is six-stranded right-handed, and has a heart of hemp. Flexible wire has a heart of hemp in each strand.
Crucible wire is made in the same manner, except that the strands are wire throughout.
Crucible wire is used for standing rigging and flexible wire for purchases, etc.
In splicing wire all tucks are made with the lay of the rope.
In making an eye splice the rope is handled better if hung up in a convenient position so that when standing up the eye will be at about the level of the chest of the person working.
A long tapering steel marline-spike is required, and after placing it under a strand do not withdraw it until the tuck is made and all the slack of the strand drawn through.
{48}There are several methods in vogue for tucking the strand, but the following is as good as any:—Tuck the first strand under two strands and all the rest under one strand respectively. Tuck whole again, and this time each strand under one strand, then halve the strands and tuck again.
To make a neat splice do not haul the part of the rope that has not been unlaid too close to the neck of the splice, and in tucking the strands never take a short nip but take long lays.
In unlaying for a long splice, always unlay two strands simultaneously, to keep the rope in its original lay. For a fair-sized rope unlay about 9 ft. of each end.
Proceed as in rope splicing, and after the three pairs of strands are in their places, single them, and continue to unlay and lay-in until the six meeting places of the strands are equi-distant.
To finish off the ends properly can only be learnt by observation and actual practice. By using two marline-spikes, the hempen heart is removed and the ends of the wire strands forced into the place it occupied, making a very neat job when finished.
Wire splices should be parcelled with oily canvas and served with Hambro' line.
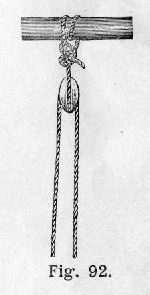
(1) Single Whip.—A rope rove through a single block fixed in any position. No power is gained (Fig. 92).
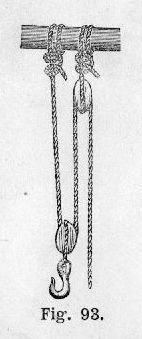
(2). Double Whip.—A rope rove through two single blocks—upper block a tail block, lower one a movable hook block. Power gained—double (Fig. 93).
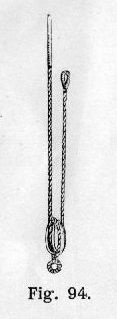
(3). A Runner adds an additional power to the purchase it is used with (Fig. 94).
(4). Gun Tackle.—single blocks. Power gained—twice or thrice, according to which is the movable block (Fig. 95).

(5). Handy Billy or Jigger.—A small tackle for general use; a double block with a tail and single block with hook (Fig. 96).
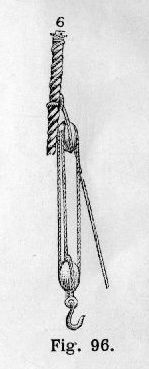
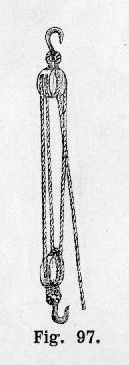
(6). Watch Tackle or Luff Tackle.—Double hook block and single hook block (Fig. 97).
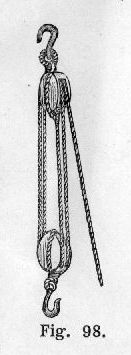
(7). Double Luff.—Two double blocks (Fig. 98).
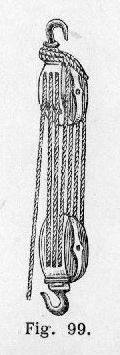
(8). Three-Fold Purchase.—Two three-fold blocks. Power gained—six or seven times (Fig. 99).
(9). Four-Fold Purchase.—Two four-fold blocks. Power gained—eight or nine times (Fig. 100).
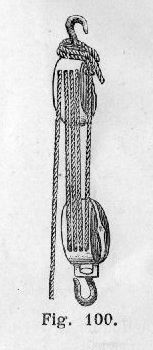
(10). A Single Spanish Burton.—Two single blocks and a hook. Power gained—three times (Fig. 101).
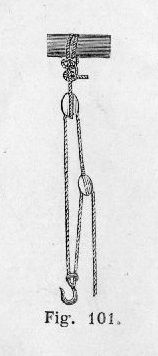
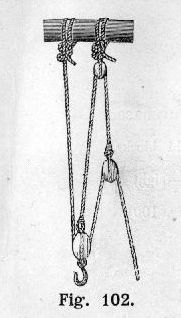
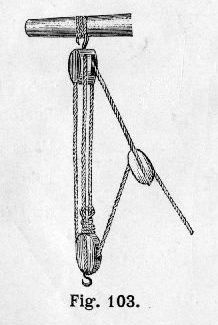
(11). A Double Spanish Burton.—There are two forms of this purchase—Fig. 102, by using three single blocks; Fig. 103, by using one double block and two single blocks. Power gained—five times.
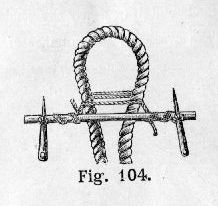
(12). A Spanish Windlass.—To rig a Spanish Windlass take a good strand well greased in the centre. Place the strand over the two parts of the rope that are to be hove together, and bringing the ends of the strand up again, place a bolt close to the strand. Take the ends of the strand and lay them up with their own parts so as to form two eyes. Take a round turn with this round the bolt, put a marline-spike through each eye and heave around (Fig. 104).
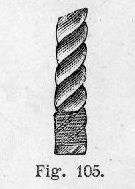
(1). A Palm and Needle Whipping is a more permanent way of securing a rope's end from fraying than the common whipping put on by hand. First, place the needle under one of the strands and draw nearly the whole length of twine through. Take a considerable number of turns round the rope with the twine, drawing each well taut in turn, and finish up by following round with the needle between each strand, forming a series of frappings, and cut off the end of the twine short (Fig. 105).
(2). A West Country Whipping is formed by middling the twine around the part of the rope to be marked and half knotting it at every half turn, so that each half knot will be on opposite sides. When a sufficient number of turns are passed, finish it off with a reef knot.
{57}(3). An American Whipping is sometimes used for the ends of hawsers. It is commenced in the same way as a common whipping, but finished off by having both ends out in the middle of the whipping and forming a reef knot. This is done by leaving the first end out when you commence to pass the turns on the bight over the last end.
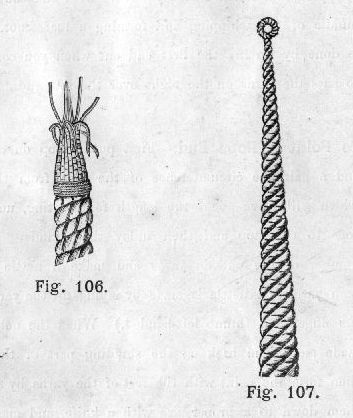
(4). To Point a Rope End.—First put a stop on at twice and a half the circumference of the rope from the end, which will leave about the length for pointing, unlay the rope to the stop and then unlay the strands. Split a number of the outside yarns and make a nettle out of each yarn. (A nettle is made by laying up the yarns with the finger and thumb left-handed.) When the nettles are made stop them back on the standing part of the rope; then form the point with the rest of the yarns by scraping them down to a proper size with a knife, and marl them down together with twine; divide the nettles, taking every other one up and every other one down. Pass three turns with a piece of twine—which is called the warp—very taut round the part where the nettles separate, taking a hitch with the last turn. Continue to repeat this process by placing every alternate nettle up and down, passing the warp or "filling," taking a hitch each time, until the {58} point is to its required length. It is generally finished off by working a small Flemish eye in the end (Figs. 106 and 107).
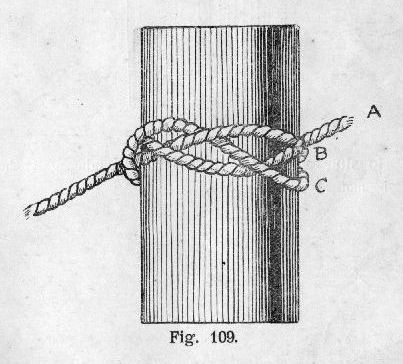
(5). Turk's Head.—The Turk's Head is one of the most common of the ornamental knots used at sea, and is formed from an ordinary clove hitch (Fig. 108) made sufficiently slack to allow for the working of the other parts.
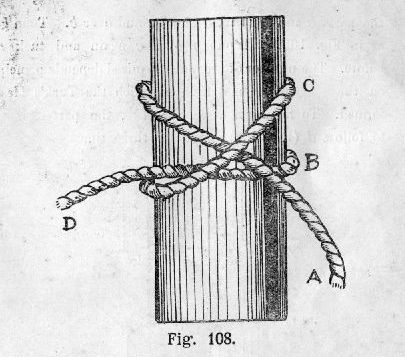
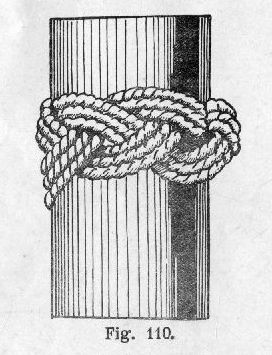
Having formed the clove hitch, pass b over c and tuck a under and up through the bight formed by c as in Fig. 109. It will then be found that there is another twist in {60} the parts b and c, tuck a under e and over b. Then go on as in Fig. 109, and put b over c again and tuck a as before. The number of crossings required depends principally on the size of the material on which the Turk's Head is formed. To finish off as in Fig. 110, the part a is made to follow d (Fig 108) round for three times.
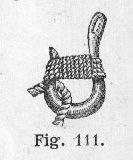
(6). Mousing a Hook.—All hooks in running gear should be moused as in Fig. 111.
(7). Securing Lead Line to Lead.—The lead is fitted with a good wire grommet parcelled over. The lead line should have a long eye spliced in it, and is secured by passing the eye through the grommet and over the lead (Fig. 112).

(8). Fitting a Flag.—A toggle should be secured at the head of the hoist by an eye splice; a length of rope equal to the width of the flag left below the hoist, as this is the distance the flags should be apart, and then a running eye splice made so as to be rapidly attached to the next flag.
(9). To Stick a Cringle.—First unlay a single strand from {62} the size of rope your cringle is required to be, whip both ends, reeve the strand through the left hand eyelet hole in the sail, having one end longer than the other—nearly a third—keeping the roping of the sail towards you. If a thimble is to be put in the cringle, lay up the parts of the strand together, counting three lays; commence with the short end of the strand towards you, then reeve the long strand from you through the right hand eyelet hole, taking it through the cringle, and it will be in the right position to lay up in the vacant space left in the cringle; when done, the one end will hang down inside the right hand eyelet hole and the other end outside the left hand one; the ends are then hitched by being rove through their respective eyelet holes and passed over the leech rope and under their own part, one hitch being towards you and the other from you; then take the ends down under one strand on the right and two on the left of cringle nearest to it; then tuck the ends under the first two strands nearest the hitch, heaving them well in place; the cringle is then fidded out, and the thimble is put in on the fore part of the sail. The ends of the strand are then tucked back, left-handed, under one strand, again under two, right-handed, as in the first place, heaving them taut in place {63} at each tuck, the ends are then whipped with two of their own yarns and cut off. If a large cringle is needed, count an extra number of lays—5, 7, etc., always an odd number.
(10). To Finish a Cringle off on the Crown.—Commence as before, but after laying up the strand, instead of forming a hitch with each end, the ends are rove through their respective eyelet holes and tucked back under two strands of the cringles and again laid up as far as the crown, forming a four-stranded cringle, and finished off by tucking the ends under two strands and crossing them under the crown of the cringle and cut close off.
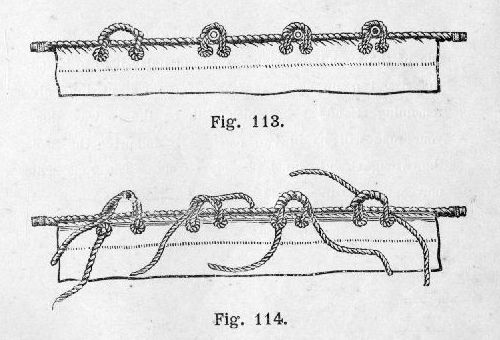
In working a cringle in a piece of rope the only difference is there are no eyelet holes, therefore the strand is tucked under two strands of the rope it is to be worked in.
(11). To Lengthen a Rope of a Sail with a Single Strand.—Say it is necessary to give a sail one cloth more spread, it would then be necessary to lengthen the head and foot rope. Supposing the width of cloth to be 2 feet and the size of the rope 3 in. After ripping the rope off four cloths, first of all cut the strand at the distance 2 ft. 6 in. from each other as in Fig. 115.

Cut one of the strands at a and unlay it to c, then cut one of the strands remaining at c and unlay it to b, laying the strand a up again as far as b; then cut the only remaining strand at b, which will be the centre, when your rope will be in two parts. By following the plan the wrong strand cannot possibly be cut. The rope will now appear as in Fig. 116.

Now marry the long end a to the end b, then lay up the long strand c in the lays of the strand a, and marry it to the other strand b as in Fig. 117.

Take a strand about 10 ft. in length of the same size rope and marry one end to the short strand a as shown above, then fill up the space left from a to c by laying in the new strand, and marry the other end to the short strand c. You will then have four splices to finish off as ordinary long splices (Fig. 118).

(11). Jury Knot. The jury knot is useful when a jury mast has to be rigged, as the loops form a means of attaching the necessary supports to the mast. The centre k (Fig. 120) is slipped over the masthead, and the weight brought on the stays tightens it and holds it in its position on the mast.
{66}It is formed by three ordinary half-hitches, each placed behind the other and with the loop of the last laid over the first, as in Fig. 119.
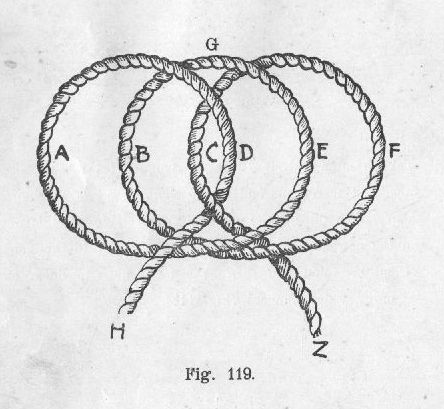
Having done this, keep the hitches together with the right hand, and with the left take a and dip it under b and pull c through a and b. Then, holding the knot with the left hand, place f over e, and pull d between e and f. Take g in the teeth and pull on the parts g, f, and a. The ends h and z may be either knotted or spliced.
{67}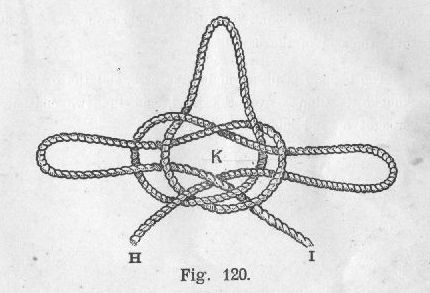
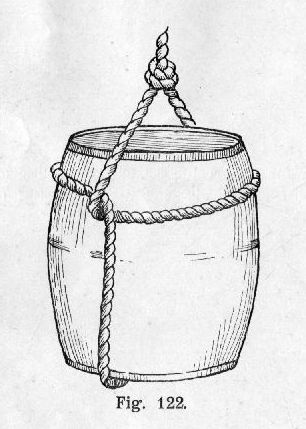
(13). Sling for a Barrel.—The following method of slinging a barrel is adopted when it is desired to hoist it up end on.
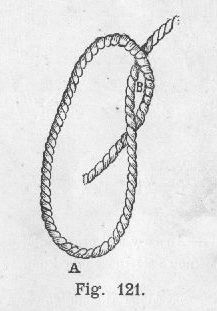
Pass the bight a of the rope under the lower end of the barrel and bring the two parts up, and with them {68} form an overhand knot b, which is opened out so as to fit over the end of the barrel.
The bight a is placed under the cask, and the overhand knot b is slipped over the head, and the two ends are brought up and knotted as in Fig. 122.
(14). Chain Knot.—An easy and ornamental way of shortening a rope is that known as the chain knot.
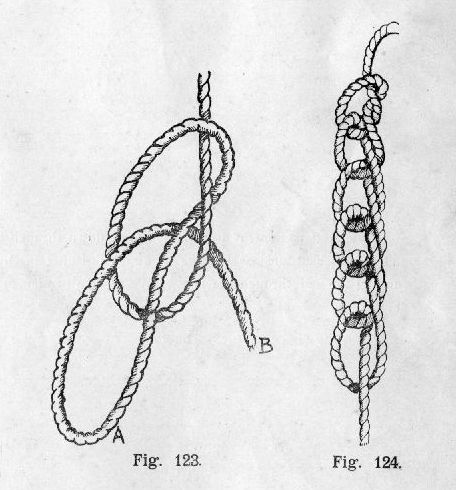
To form it proceed as though you are going to make an ordinary overhand knot, but instead of working with both ends use the end and a bight as in Fig. 123.
{69}This will form the loop a, Fig. 123, through which pass a bight of b and continue in this way until all the slack rope is used up, and it can be finished off by running the end through the last loop (Fig. 124).
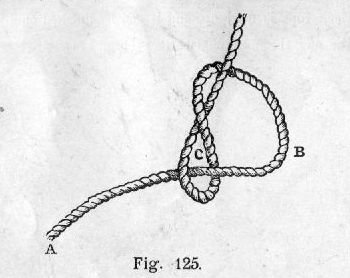
(15). Double Chain.—The Double Chain is a little more intricate than the chain knot, and is formed by taking a turn round the standing part and thus forming a loop {70} c, through which the end a is passed, thus forming the loop b (Fig. 125).
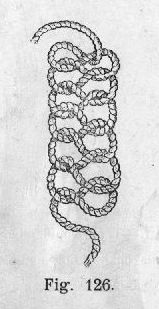
The end a is brought back and dipped down through b and this is continued as long as required, finishing off by running the end through the last bight and hauling it taut (Fig. 126).
(16). Twist Or Plait Knot.—Another method of shortening a small handy rope is known as the twist or plait knot.
Arrange the rope in such a manner that the amount to be taken up forms a bight as in Fig. 127.
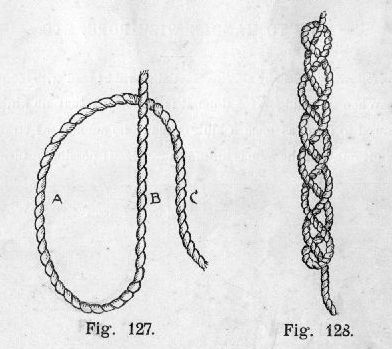
Then by taking a over b and c over b, and so on, taking the outside one on each side alternately over the middle one, the plait is formed. To keep the plait clear, the end has to be continually dipped through the first bight made (Fig. 128).
The following article by a Wire Specialist will be read with interest:—
When uncoiling Wire Rope it is important that no kinks are allowed to form, as once a kink is made no amount of strain can take it out, and the rope is unsafe to work. If possible a turn-table should be employed (an old cart wheel mounted on a spindle makes an excellent one); the rope will then lead off perfectly straight without kinks. (See Fig. 129.)
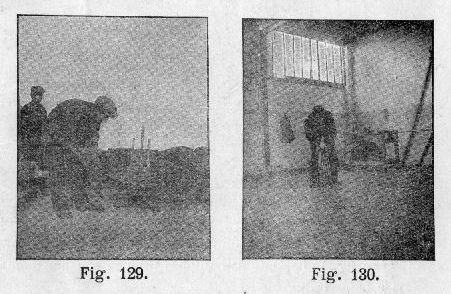
If a turn-table is not available the rope may be rolled along the ground as shown in Fig. 130.
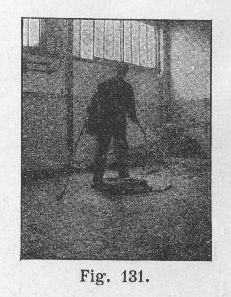
{73}In no case must the rope be laid on the ground and the end taken over (as in Fig. 131), or kinks will result, and the rope will be completely spoiled.
The life of Wire Rope depends principally upon the diameter of drums, sheaves, and pulleys; and too much importance cannot be given to the size of the latter. Wherever possible the size of the pulleys should be not less than 700 times the diameter of the largest wire in the rope, and never less than 300 times. The diameters of drums, sheaves, and pulleys should increase with the working load when the factor of safety is less than 5 to 1.
The load should not be lifted with a jerk, as the strain may equal three or four times the proper load, and a sound rope may easily be broken.
Examine ropes frequently. A new rope is cheaper than the risk of killing or maiming employees.
{74}One-fifth of the ultimate strength of the rope should be considered a fair working load.
In shafts and elevators where human life is constantly raised and lowered, the working load should not be more than one-tenth of the ultimate breaking strength of the rope.
To increase the amount of work done, it is better to increase the working load than the speed of the rope. Experience has shown that the wear of the rope increases with the speed.
Wire Rope should be greased when running or idle. Rust destroys as effectively as hard work.
Galvanized Wire Rope should never be used for running rope. One day's use will wear off the coating of zinc, and the rope will soon begin to rust.
Great care should be taken that the grooves of drums and sheaves are perfectly smooth, ample in diameter, and conformed to the surface of the rope. They should also be in perfect line with the rope, so that the latter may not chafe on the sides of the grooves.
To produce the best work, the splicer should have at his disposal a set of tools similar to those in the accompanying illustration.
The Tool set consists of—1 Tucker for Small Strands Splicing; 1 Marlin Spike, Round; 1 Marlin Spike, Flatted; 1 Pair Special Steel Wire Cutters; 1 Serving Mallet. All of best Cast Steel, Hand Forged.
{75}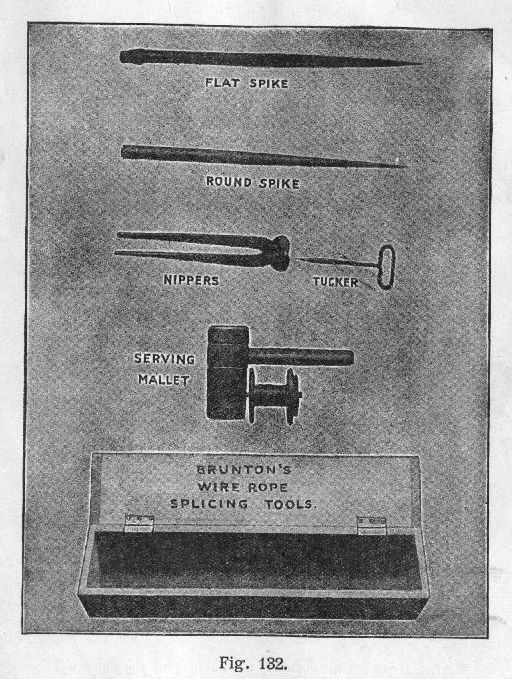
These Sets may be had at prices varying from 15/6 to 46/-.
TO MAKE AN ENDLESS SPLICE.—Clamps are applied to the rope sufficiently far back from the ends to allow plenty of room for the splice, and the men to operate in. The two ends are then drawn together by means of blocks and tackle, until they overlap each other for a space of twenty to thirty feet, according to the size of the rope. At a point from each end midway of the lap, the rope must be bound with a good serving of No. 18 or No. 20 annealed wire. The serving at the extreme ends is then cut off, the strands untwisted to the new serving, and the hemp cores also cut off so as to abut when the open bunches of strands are brought together, and the opposite strands interlaced regularly with each other, presenting the appearance as near as can be shown (Fig. 133).
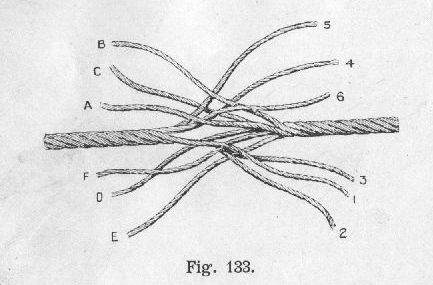
After these are all correctly interlaced, pull the ropes tightly together, so that the cores abut against one another. Next take {77} strand No. 1, and as it is being unlaid, follow it up with strand A, which must be laid into its place tightly until within five feet from the end. Strand No. 1 is then cut off, leaving it five feet long, same length as A strand. The remaining strands are treated the same way, three alternate strands being laid towards the right hand and three to the left. The strands being now all laid in their places, the ends are cut off, as with the first strands, to five feet. The appearance of splice will now be the same as in Fig. 134.

The next thing is to tuck in the ends, and this is where the skill comes in. Before doing this, care should be observed to see that the spliced portion of the rope is perfectly limp, or free of tension, otherwise this operation cannot be well performed. The core is then cut and pulled out on the side corresponding with the end to be tucked in for a distance equal to the length of the end which is to replace it. It is desirable, especially if the rope is composed of small wires, to tie the ends of the strands with soft twine or threads of jute yarn in order to keep the wires well bunched. A marlin spike is then passed over 1 and under two of the strands, when the core is cut off at the proper point, and by moving the spike along the rope spirally with the strands, the loose end 1 is passed into the core space and the spike withdrawn. {78} Then pull out the core on the other side, pass the marlin spike over A and under two strands as before, cut off the core, and tuck in the end A in precisely the same manner, after which the rope is twisted back again as tightly as possible, and the clamps or other appliances that may be used are removed to the next pair of projecting ends. Any slight inequality in the symmetrical shape of the rope may be taken out by pounding with a wooden mallet. Some prefer to tuck in first all the ends projecting in one direction, and then the ends projecting the other way; it is immaterial in what order they are tucked in.
If these directions are implicitly followed, the spliced portion of the rope will be of uniform diameter with other portions, and will present a smooth and even appearance throughout. After running a day or two, the locality of the splice cannot be readily detected, and the rope will be quite as strong in this portion as any other.
UNDER AND OVER STYLE—Ordinary type of Wire Rope. Serve the rope with wire or tarred yarn to suit the circumference of the thimble, bend round thimble and tie securely in place with temporary lashing till splice is finished (as in Fig. 135). Open out the strands (as in Fig. 136), taking care to keep the loose end of the rope to the left hand (see Fig. 136). Now insert marlin spike, lifting two strands (as shown in Fig. 137), and tuck away towards the right hand (that is inserting the strand at the point, and over the spike) strand No. 1, pulling the strand well home. Next {80} insert marlin spike through next strand to the left, only lifting one strand, the point of the spike coming out at the same place as before. Tuck away strand No. 2 as before.
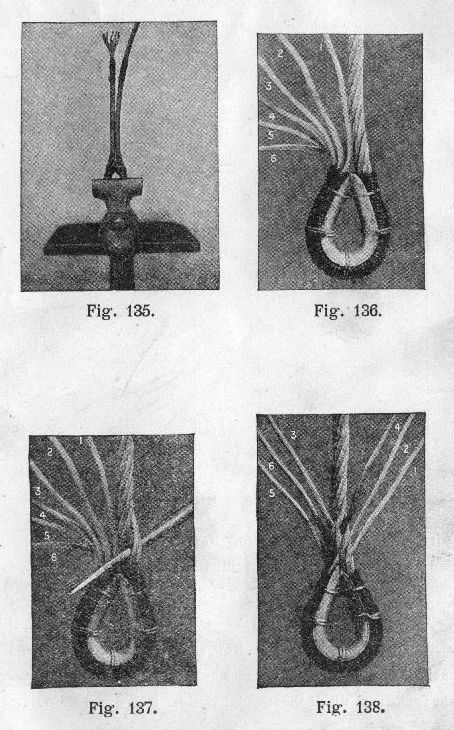
The next tuck is the locking tuck. Insert marlin spike in next strand, and, missing No. 3, tuck away strand No. 4 from the point of the spike towards the right hand. Now, without taking out the spike, tuck away strand No. 3 behind the spike towards the left hand (as shown in Fig. 138). Now insert spike in next strand, and tuck away strand No. 5 behind and over the spike. No. 6 likewise. Pull all the loose strands well down.
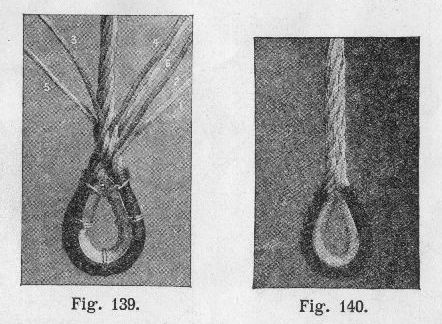
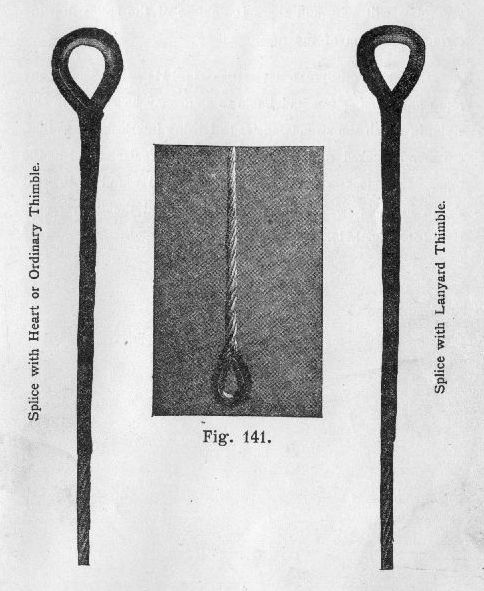
This completes the first series of tucks, and the splice will, if made properly, be as Fig. 139. Now, starting with strand No. 1 and taking each strand in rotation, tuck away under one strand and over the next strand till all the strands have been tucked four times. If {81} it is intended to taper the splice, the strands may at this point be split, and half of the wires being tucked away as before, the other half cut close to the splice. Fig. 127 [Transcriber's note: 140?] shows the finished splice ready for serving over.
{82}It will be noticed that this style of splice possesses a plaited appearance, and the more strain applied to the rope, the tighter the splice will grip, and there is no fear of the splice drawing owing to rotation of the rope.
LIVERPOOL OR SPIRAL STYLE (See Fig. 141).—Hawsers, or any ropes not hanging free and liable to spin, may be spliced in this style, in which the strands, instead of being interlocked together, are merely tucked round and round one particular strand in the rope. Each loose strand is of course tucked round a different strand in the rope. This is sometimes called the "Liverpool" style (See Fig. 141).
  KINDS.                         LENGTH.           WEIGHT.

  Reefing twine,                 24 skeins         8 to 9 lbs.
  Sewing twine,                  24   "            8 to 9 lbs.
  Marline,                       12   "            4 lbs.
  Log lines,                     25 fathoms        1 to 3 lbs.
  Samson lines,                  30   "            3/4 lb.
  Samson lines,                  30   "            1 lb.
  Samson lines,                  30   "            1 1/4 lbs.
  Samson lines,                  30   "            1 1/2 lbs.
  Fishing lines,                 25   "            1/4 lb.
  Fishing lines,                 25   "            1/2 lb.
  Fishing lines,                 25   "            3/4 lb.
  Fishing lines,                 25   "            1 lb.
  Hambro'-lines (6 threads),     23   "            1 1/2 lbs.
  Hambro'-lines (9 threads),     23   "            2 1/4 lbs.
  Hambro'-lines (12 threads),    23   "            3 lbs.
  Hand lead lines,               20   "            4 lbs.
  Deep sea lines,               120   "           28 lbs.
  Deep sea lines,               120   "           32 lbs.
  Deep sea lines,               120   "           34 lbs.
  Deep sea lines,               120   "           36 lbs.
                              Working    Breaking    Ordinary
  Hemp.    Iron.     Steel.    Load.      Strain.     Chain.
                               Cwts.       Tons.

  2 3/4    1                     6           2         5/16
           1 1/2     1           9           3
  3 3/4    1 5/8                12           4
           1 3/4     1 1/2      15           5
  4 1/2    1 7/8                18           6
           2         1 5/8      21           7
  5 1/2    2 1/8     1 3/4      24           8         9/16
           2 1/4                27           9
  6        2 3/8     1 7/8      30          10
  6 1/2    2 5/8     2          36          12
           2 3/4     2 1/8      37          13
  7        2 7/8     2 1/4      42          14        11/16
  7 1/2    3 1/8     2 3/8      48          16
  8        3 3/8     2 1/2      54          18
           3 1/2     2 5/8      60          20
  8 1/2    3 5/8     2 3/4      66          22
  9 1/2    3 7/8     3 1/4      78          26        15/16
  10       4                    84          28        1
           4 1/4     3 3/8      90          30
  11       4 3/8                96          32
           4 1/2     3 1/2     108          36
  12       4 5/8     3 3/4     120          40
[Transcriber's note: in the source book, the following two tables were a single table. It has been split into two due to space limitations.]
  Circum-
  ference             White                       Tarred
  of Rope.         Manila Rope.                 Hemp Rope.                 Coir Rope.

            Weight                         Weight                     Weight
            for 120        Breaking        for 120     Breaking       for 120       Breaking
            Fathoms.        Strain.        Fathoms.    Strain.        Fathoms.      Strain.


  Ins.     Ct.  Qr.  Lb.  Tns.  Cwts.  Ct.  Qr.  Lb.  Tns.  Cwts.  Ct.  Qr.  Lb.  Tns.  Cwts.

  1             --              --          --            --            --             --
  1 1/4         --              --          --            --            --             --
  1 1/2         --              --          --            --            --             --
  1 3/4         --              --          --            --            --             --

  2         0    3    4     1     6     1    0    0    0     19     0    2    4    0      6
  2 1/4     0    3   26     1    13     1    0   27    1      2     0    2   19    0      8
  2 1/2     1    0   20     2     0     1    2    4    1      7     0    3    9    0     10
  2 3/4     1    1   25     2     9     1    3   11    1     13     1    0    0    0     12

  3         1    3    2     2    18     2    0   22    2      2     1    0   22    0     14
  3 1/4     2    0    7     3     8     2    2   10    2      7     1    1   17    0     16
  3 1/2     2    1   12     3    19     3    0    2    2     17     1    2   15    0     19
  3 3/4     2    2   21     4    11     3    1   21    3      7     1    3   14    1      2

  4         3    0    6     5     3     4    0    0    3     17     2    0   16    1      5
  4 1/4     3    2    0     5    17     4    2    0    4      4     2    1   18    1      8
  4 1/2     3    3   20     6    11     4    3   24    4     10     2    2   20    1     12

  5         4    2   24     8     2     6    0   15    5     10     3    1    8    2      0
  5 1/2     5    3   16     9    16     7    1   15    6     10     4    0    0    2      8

  6         7    0    8    11    13     8    3    4    8      9     4    3    4    2     18
  6 1/2     8    1    0    13    14    10    1   12    9      9     5    2   12    3      6

  7         9    1   20    15    18    12    0    8    11     9     6    2    4    3     18

  8        12    0   24    20    14    16    0    0    15     9     8    2    8    5      0
                                     Galvanised            Galvanised
  Circum-      Galvanised            Patent Steel          Patent Steel
  ference      Rigging               Flexible              Extra Flexible
  of Rope.     Wire Rope.            Wire Rope.            Wire Rope.

            Weight                Weight                Weight
            per       Breaking    per       Breaking    per        Breaking
            Fathom.   Strain      Fathom.   Strain      Fathom.    Strain

            Lbs.      Tons.       Lbs.      Tons.       Lbs.       Tons.

  1          1.2       1 3/4        .76      1 3/4       .88        2 1/2
  1 1/4      1.6       3           1.12      2 7/8      1.36        4
  1 1/2      2.2       4           1.44      4          2.00        7
  1 3/4      3.0       5 1/2       2.00      5 1/2      2.72        9

  2          3.8       7           2.40      7          3.48       11
  2 1/4      4.6       9           3.12      9 1/2      4.44       13 1/2
  2 1/2      5.8      11           4.00     12 1/2      5.44       17 1/2
  2 3/4      6.8      13           4.64     15 1/2      6.72       22 1/2

  3          8.0      16           5.48     18          8.00       25 1/2
  3 1/4      9.2      19           6.80     22          9.48       30
  3 1/2     11.2      22           7.80     26         11.00       36
  3 3/4     12.4      26           9.00     29         12.44       40

  4         14.4      30          10.00     33         14.24       44
  4 1/4     17.0      34          11.20     35         16.00       49
  4 1/2     18.4      38          12.80     39         18.00       50

  5          --       --           --       --          --         --
  5 1/2      --       --           --       --          --         --

  6          --       --           --       --          --         --
  6 1/2      --       --           --       --          --         --

  7          --       --           --       --          --         --

  8          --       --           --       --          --         --
  INCHES.      MEAN BREAKING STRAIN.         TEST.
                      Tons.

  1 1/4                44                    18.8
  1                    29                    12.0
    7/8                23                     9.1
    3/4                17                     6.8
    5/8                12                     4.6
    1/2                 7 1/2                 3.0
End of Project Gutenberg's Knots, Bends, Splices, by J. Netherclift Jutsum

*** END OF THIS PROJECT GUTENBERG EBOOK KNOTS, BENDS, SPLICES ***

***** This file should be named 30983-h.htm or 30983-h.zip *****
This and all associated files of various formats will be found in:
        https://www.gutenberg.org/3/0/9/8/30983/

Produced by Al Haines

Updated editions will replace the previous one--the old editions
will be renamed.

Creating the works from public domain print editions means that no
one owns a United States copyright in these works, so the Foundation
(and you!) can copy and distribute it in the United States without
permission and without paying copyright royalties.  Special rules,
set forth in the General Terms of Use part of this license, apply to
copying and distributing Project Gutenberg-tm electronic works to
protect the PROJECT GUTENBERG-tm concept and trademark.  Project
Gutenberg is a registered trademark, and may not be used if you
charge for the eBooks, unless you receive specific permission.  If you
do not charge anything for copies of this eBook, complying with the
rules is very easy.  You may use this eBook for nearly any purpose
such as creation of derivative works, reports, performances and
research.  They may be modified and printed and given away--you may do
practically ANYTHING with public domain eBooks.  Redistribution is
subject to the trademark license, especially commercial
redistribution.


*** START: FULL LICENSE ***

THE FULL PROJECT GUTENBERG LICENSE
PLEASE READ THIS BEFORE YOU DISTRIBUTE OR USE THIS WORK

To protect the Project Gutenberg-tm mission of promoting the free
distribution of electronic works, by using or distributing this work
(or any other work associated in any way with the phrase "Project
Gutenberg"), you agree to comply with all the terms of the Full Project
Gutenberg-tm License (available with this file or online at
https://gutenberg.org/license).


Section 1.  General Terms of Use and Redistributing Project Gutenberg-tm
electronic works

1.A.  By reading or using any part of this Project Gutenberg-tm
electronic work, you indicate that you have read, understand, agree to
and accept all the terms of this license and intellectual property
(trademark/copyright) agreement.  If you do not agree to abide by all
the terms of this agreement, you must cease using and return or destroy
all copies of Project Gutenberg-tm electronic works in your possession.
If you paid a fee for obtaining a copy of or access to a Project
Gutenberg-tm electronic work and you do not agree to be bound by the
terms of this agreement, you may obtain a refund from the person or
entity to whom you paid the fee as set forth in paragraph 1.E.8.

1.B.  "Project Gutenberg" is a registered trademark.  It may only be
used on or associated in any way with an electronic work by people who
agree to be bound by the terms of this agreement.  There are a few
things that you can do with most Project Gutenberg-tm electronic works
even without complying with the full terms of this agreement.  See
paragraph 1.C below.  There are a lot of things you can do with Project
Gutenberg-tm electronic works if you follow the terms of this agreement
and help preserve free future access to Project Gutenberg-tm electronic
works.  See paragraph 1.E below.

1.C.  The Project Gutenberg Literary Archive Foundation ("the Foundation"
or PGLAF), owns a compilation copyright in the collection of Project
Gutenberg-tm electronic works.  Nearly all the individual works in the
collection are in the public domain in the United States.  If an
individual work is in the public domain in the United States and you are
located in the United States, we do not claim a right to prevent you from
copying, distributing, performing, displaying or creating derivative
works based on the work as long as all references to Project Gutenberg
are removed.  Of course, we hope that you will support the Project
Gutenberg-tm mission of promoting free access to electronic works by
freely sharing Project Gutenberg-tm works in compliance with the terms of
this agreement for keeping the Project Gutenberg-tm name associated with
the work.  You can easily comply with the terms of this agreement by
keeping this work in the same format with its attached full Project
Gutenberg-tm License when you share it without charge with others.

1.D.  The copyright laws of the place where you are located also govern
what you can do with this work.  Copyright laws in most countries are in
a constant state of change.  If you are outside the United States, check
the laws of your country in addition to the terms of this agreement
before downloading, copying, displaying, performing, distributing or
creating derivative works based on this work or any other Project
Gutenberg-tm work.  The Foundation makes no representations concerning
the copyright status of any work in any country outside the United
States.

1.E.  Unless you have removed all references to Project Gutenberg:

1.E.1.  The following sentence, with active links to, or other immediate
access to, the full Project Gutenberg-tm License must appear prominently
whenever any copy of a Project Gutenberg-tm work (any work on which the
phrase "Project Gutenberg" appears, or with which the phrase "Project
Gutenberg" is associated) is accessed, displayed, performed, viewed,
copied or distributed:

This eBook is for the use of anyone anywhere at no cost and with
almost no restrictions whatsoever.  You may copy it, give it away or
re-use it under the terms of the Project Gutenberg License included
with this eBook or online at www.gutenberg.org

1.E.2.  If an individual Project Gutenberg-tm electronic work is derived
from the public domain (does not contain a notice indicating that it is
posted with permission of the copyright holder), the work can be copied
and distributed to anyone in the United States without paying any fees
or charges.  If you are redistributing or providing access to a work
with the phrase "Project Gutenberg" associated with or appearing on the
work, you must comply either with the requirements of paragraphs 1.E.1
through 1.E.7 or obtain permission for the use of the work and the
Project Gutenberg-tm trademark as set forth in paragraphs 1.E.8 or
1.E.9.

1.E.3.  If an individual Project Gutenberg-tm electronic work is posted
with the permission of the copyright holder, your use and distribution
must comply with both paragraphs 1.E.1 through 1.E.7 and any additional
terms imposed by the copyright holder.  Additional terms will be linked
to the Project Gutenberg-tm License for all works posted with the
permission of the copyright holder found at the beginning of this work.

1.E.4.  Do not unlink or detach or remove the full Project Gutenberg-tm
License terms from this work, or any files containing a part of this
work or any other work associated with Project Gutenberg-tm.

1.E.5.  Do not copy, display, perform, distribute or redistribute this
electronic work, or any part of this electronic work, without
prominently displaying the sentence set forth in paragraph 1.E.1 with
active links or immediate access to the full terms of the Project
Gutenberg-tm License.

1.E.6.  You may convert to and distribute this work in any binary,
compressed, marked up, nonproprietary or proprietary form, including any
word processing or hypertext form.  However, if you provide access to or
distribute copies of a Project Gutenberg-tm work in a format other than
"Plain Vanilla ASCII" or other format used in the official version
posted on the official Project Gutenberg-tm web site (www.gutenberg.org),
you must, at no additional cost, fee or expense to the user, provide a
copy, a means of exporting a copy, or a means of obtaining a copy upon
request, of the work in its original "Plain Vanilla ASCII" or other
form.  Any alternate format must include the full Project Gutenberg-tm
License as specified in paragraph 1.E.1.

1.E.7.  Do not charge a fee for access to, viewing, displaying,
performing, copying or distributing any Project Gutenberg-tm works
unless you comply with paragraph 1.E.8 or 1.E.9.

1.E.8.  You may charge a reasonable fee for copies of or providing
access to or distributing Project Gutenberg-tm electronic works provided
that

- You pay a royalty fee of 20% of the gross profits you derive from
     the use of Project Gutenberg-tm works calculated using the method
     you already use to calculate your applicable taxes.  The fee is
     owed to the owner of the Project Gutenberg-tm trademark, but he
     has agreed to donate royalties under this paragraph to the
     Project Gutenberg Literary Archive Foundation.  Royalty payments
     must be paid within 60 days following each date on which you
     prepare (or are legally required to prepare) your periodic tax
     returns.  Royalty payments should be clearly marked as such and
     sent to the Project Gutenberg Literary Archive Foundation at the
     address specified in Section 4, "Information about donations to
     the Project Gutenberg Literary Archive Foundation."

- You provide a full refund of any money paid by a user who notifies
     you in writing (or by e-mail) within 30 days of receipt that s/he
     does not agree to the terms of the full Project Gutenberg-tm
     License.  You must require such a user to return or
     destroy all copies of the works possessed in a physical medium
     and discontinue all use of and all access to other copies of
     Project Gutenberg-tm works.

- You provide, in accordance with paragraph 1.F.3, a full refund of any
     money paid for a work or a replacement copy, if a defect in the
     electronic work is discovered and reported to you within 90 days
     of receipt of the work.

- You comply with all other terms of this agreement for free
     distribution of Project Gutenberg-tm works.

1.E.9.  If you wish to charge a fee or distribute a Project Gutenberg-tm
electronic work or group of works on different terms than are set
forth in this agreement, you must obtain permission in writing from
both the Project Gutenberg Literary Archive Foundation and Michael
Hart, the owner of the Project Gutenberg-tm trademark.  Contact the
Foundation as set forth in Section 3 below.

1.F.

1.F.1.  Project Gutenberg volunteers and employees expend considerable
effort to identify, do copyright research on, transcribe and proofread
public domain works in creating the Project Gutenberg-tm
collection.  Despite these efforts, Project Gutenberg-tm electronic
works, and the medium on which they may be stored, may contain
"Defects," such as, but not limited to, incomplete, inaccurate or
corrupt data, transcription errors, a copyright or other intellectual
property infringement, a defective or damaged disk or other medium, a
computer virus, or computer codes that damage or cannot be read by
your equipment.

1.F.2.  LIMITED WARRANTY, DISCLAIMER OF DAMAGES - Except for the "Right
of Replacement or Refund" described in paragraph 1.F.3, the Project
Gutenberg Literary Archive Foundation, the owner of the Project
Gutenberg-tm trademark, and any other party distributing a Project
Gutenberg-tm electronic work under this agreement, disclaim all
liability to you for damages, costs and expenses, including legal
fees.  YOU AGREE THAT YOU HAVE NO REMEDIES FOR NEGLIGENCE, STRICT
LIABILITY, BREACH OF WARRANTY OR BREACH OF CONTRACT EXCEPT THOSE
PROVIDED IN PARAGRAPH F3.  YOU AGREE THAT THE FOUNDATION, THE
TRADEMARK OWNER, AND ANY DISTRIBUTOR UNDER THIS AGREEMENT WILL NOT BE
LIABLE TO YOU FOR ACTUAL, DIRECT, INDIRECT, CONSEQUENTIAL, PUNITIVE OR
INCIDENTAL DAMAGES EVEN IF YOU GIVE NOTICE OF THE POSSIBILITY OF SUCH
DAMAGE.

1.F.3.  LIMITED RIGHT OF REPLACEMENT OR REFUND - If you discover a
defect in this electronic work within 90 days of receiving it, you can
receive a refund of the money (if any) you paid for it by sending a
written explanation to the person you received the work from.  If you
received the work on a physical medium, you must return the medium with
your written explanation.  The person or entity that provided you with
the defective work may elect to provide a replacement copy in lieu of a
refund.  If you received the work electronically, the person or entity
providing it to you may choose to give you a second opportunity to
receive the work electronically in lieu of a refund.  If the second copy
is also defective, you may demand a refund in writing without further
opportunities to fix the problem.

1.F.4.  Except for the limited right of replacement or refund set forth
in paragraph 1.F.3, this work is provided to you 'AS-IS' WITH NO OTHER
WARRANTIES OF ANY KIND, EXPRESS OR IMPLIED, INCLUDING BUT NOT LIMITED TO
WARRANTIES OF MERCHANTIBILITY OR FITNESS FOR ANY PURPOSE.

1.F.5.  Some states do not allow disclaimers of certain implied
warranties or the exclusion or limitation of certain types of damages.
If any disclaimer or limitation set forth in this agreement violates the
law of the state applicable to this agreement, the agreement shall be
interpreted to make the maximum disclaimer or limitation permitted by
the applicable state law.  The invalidity or unenforceability of any
provision of this agreement shall not void the remaining provisions.

1.F.6.  INDEMNITY - You agree to indemnify and hold the Foundation, the
trademark owner, any agent or employee of the Foundation, anyone
providing copies of Project Gutenberg-tm electronic works in accordance
with this agreement, and any volunteers associated with the production,
promotion and distribution of Project Gutenberg-tm electronic works,
harmless from all liability, costs and expenses, including legal fees,
that arise directly or indirectly from any of the following which you do
or cause to occur: (a) distribution of this or any Project Gutenberg-tm
work, (b) alteration, modification, or additions or deletions to any
Project Gutenberg-tm work, and (c) any Defect you cause.


Section  2.  Information about the Mission of Project Gutenberg-tm

Project Gutenberg-tm is synonymous with the free distribution of
electronic works in formats readable by the widest variety of computers
including obsolete, old, middle-aged and new computers.  It exists
because of the efforts of hundreds of volunteers and donations from
people in all walks of life.

Volunteers and financial support to provide volunteers with the
assistance they need are critical to reaching Project Gutenberg-tm's
goals and ensuring that the Project Gutenberg-tm collection will
remain freely available for generations to come.  In 2001, the Project
Gutenberg Literary Archive Foundation was created to provide a secure
and permanent future for Project Gutenberg-tm and future generations.
To learn more about the Project Gutenberg Literary Archive Foundation
and how your efforts and donations can help, see Sections 3 and 4
and the Foundation web page at https://www.pglaf.org.


Section 3.  Information about the Project Gutenberg Literary Archive
Foundation

The Project Gutenberg Literary Archive Foundation is a non profit
501(c)(3) educational corporation organized under the laws of the
state of Mississippi and granted tax exempt status by the Internal
Revenue Service.  The Foundation's EIN or federal tax identification
number is 64-6221541.  Its 501(c)(3) letter is posted at
https://pglaf.org/fundraising.  Contributions to the Project Gutenberg
Literary Archive Foundation are tax deductible to the full extent
permitted by U.S. federal laws and your state's laws.

The Foundation's principal office is located at 4557 Melan Dr. S.
Fairbanks, AK, 99712., but its volunteers and employees are scattered
throughout numerous locations.  Its business office is located at
809 North 1500 West, Salt Lake City, UT 84116, (801) 596-1887, email
[email protected].  Email contact links and up to date contact
information can be found at the Foundation's web site and official
page at https://pglaf.org

For additional contact information:
     Dr. Gregory B. Newby
     Chief Executive and Director
     [email protected]


Section 4.  Information about Donations to the Project Gutenberg
Literary Archive Foundation

Project Gutenberg-tm depends upon and cannot survive without wide
spread public support and donations to carry out its mission of
increasing the number of public domain and licensed works that can be
freely distributed in machine readable form accessible by the widest
array of equipment including outdated equipment.  Many small donations
($1 to $5,000) are particularly important to maintaining tax exempt
status with the IRS.

The Foundation is committed to complying with the laws regulating
charities and charitable donations in all 50 states of the United
States.  Compliance requirements are not uniform and it takes a
considerable effort, much paperwork and many fees to meet and keep up
with these requirements.  We do not solicit donations in locations
where we have not received written confirmation of compliance.  To
SEND DONATIONS or determine the status of compliance for any
particular state visit https://pglaf.org

While we cannot and do not solicit contributions from states where we
have not met the solicitation requirements, we know of no prohibition
against accepting unsolicited donations from donors in such states who
approach us with offers to donate.

International donations are gratefully accepted, but we cannot make
any statements concerning tax treatment of donations received from
outside the United States.  U.S. laws alone swamp our small staff.

Please check the Project Gutenberg Web pages for current donation
methods and addresses.  Donations are accepted in a number of other
ways including including checks, online payments and credit card
donations.  To donate, please visit: https://pglaf.org/donate


Section 5.  General Information About Project Gutenberg-tm electronic
works.

Professor Michael S. Hart was the originator of the Project Gutenberg-tm
concept of a library of electronic works that could be freely shared
with anyone.  For thirty years, he produced and distributed Project
Gutenberg-tm eBooks with only a loose network of volunteer support.


Project Gutenberg-tm eBooks are often created from several printed
editions, all of which are confirmed as Public Domain in the U.S.
unless a copyright notice is included.  Thus, we do not necessarily
keep eBooks in compliance with any particular paper edition.


Most people start at our Web site which has the main PG search facility:

     https://www.gutenberg.org

This Web site includes information about Project Gutenberg-tm,
including how to make donations to the Project Gutenberg Literary
Archive Foundation, how to help produce our new eBooks, and how to
subscribe to our email newsletter to hear about new eBooks.